If adorably quirky perky BBC gardener Alys Fowler can scavenge veggies to throw in her various garden allotment campfire contraptions, well then, so can I. My bigger garden is a bit of a walk from the house and sometimes I get a hankering to make a cup of tea or herby stew before I’m done with the day’s tasks. Any excuse for a little live-fire feasting.

So I’ve had it on my mind to create a little portable outdoor garden kitchen get-up lately and then, lo and behold, I run smack dab into Ethel Lynn’s 1917 memoir, The Adventures of a Woman Hobo. You wouldn’t believe her story. It turns out Ethel is a young physician with a thriving practice in San Francisco when the 1906 earthquake strikes. Her office is destroyed but she and her feller, Dan, wed and travel to Chicago to get funding for his big invention. Well. Another unfortunate strike ensues: the panic of 1907. Stocks plummet, run on banks, nobody funding inventions and they end up living in a “hovel” just about starving. As if things aren’t bad enough, in 1908, Ethel finds out she’s in the incipient (early) stage of tuberculosis and is advised to move back to California post haste. Not to be defeated, (after all, how many female physicians were there in her day), she trades her only remaining prized possession, an opera cloak, for a green tandem bicycle. With a hell of alot more “nerve and grit” than her whiney husband, Dan, she declares they’re riding the bike From Chicago to California. Which they do, with their portable “cooking stove outfit”. Thanks to google books (link above), we can find out how the story ends while we sip on a bit of thin hobo stew that we’re going to make on our home-made tin can rocket stove. Grab your green tandem bike and let’s go!
This little stove is amazing!! Unlike your boy or girl scout version, you can boil water with a few small sticks, and the stove weighs almost nothing. The super efficient “rocket stove” was designed in the ’80s by a mechanical engineer for the alternative energy education outreach program, Aprovecho. This rocket stove link is a delight. You can buy an inexpensive version for $35 if you dare, and even better is their free pdf booklet on how to make this stove and things like a bread oven from a 55 gallon drum. Plus there’s a nifty video for making a bigger version of this stove. There are detailed instructions on how to build your own hobo tin-can rocket stove in my new book, Picnic Time, which sells for only $5.95 on Amazon or on our Native Ground website.
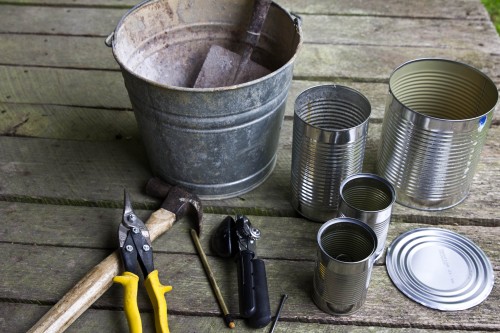
You’ll need a few things. A gallon can with both top and bottom, a pineapple juice can, two bean-sized cans, tin snips, a hammer and something like a giant nail. And some ashes. And work gloves and maybe even something to protect your eyes. And pliers.
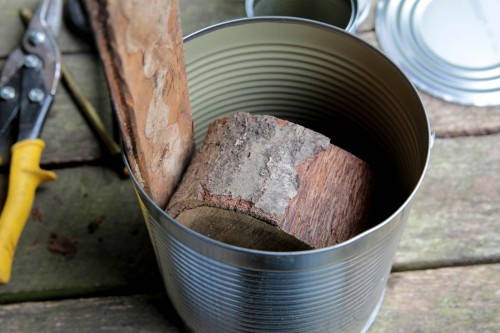
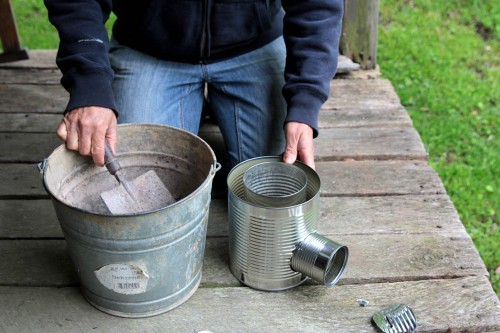
Stick something against the side of the can so it doesn’t get squished when you hammer the nail into the side to start a hole for your tin snips. This is make-do stove making. You’re going to stick one of the bean cans into a hole you’re going to make through both cans, so you need to draw a bean can outline for cutting on each can.
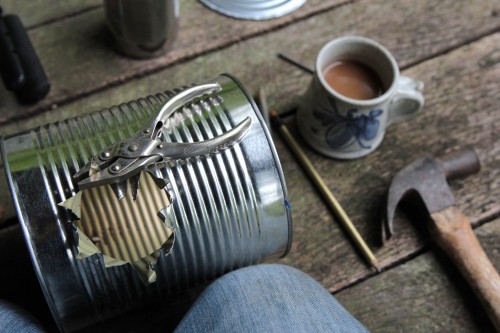
Now, you’ll need to start in the middle hole you banged with your hammer and then cut to the edges of the hole, at which point things fell apart for me. So Wayne stepped in because he writes and sings about old-time ramblers and such and that must count for something … and I’m not an expert hobo chick yet.
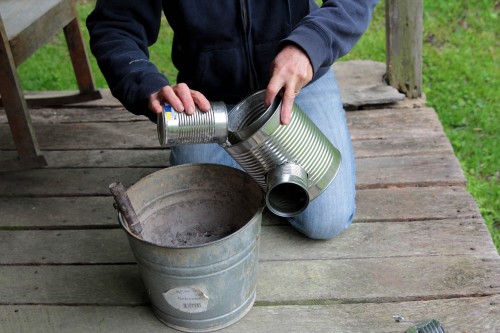
You need to fold these flaps under so you can poke your can through. Use pliers and good luck.
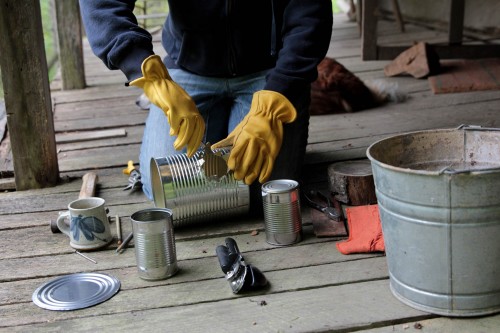
Now, both ends of your bean can have been removed and you poke them through both cans just like that. Thank you, Wayne.
Fill the space between the cans with ashes (for insulation).
A can works better.
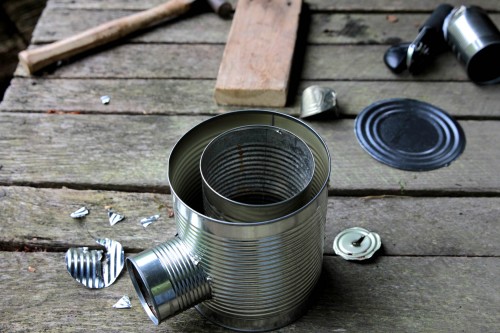
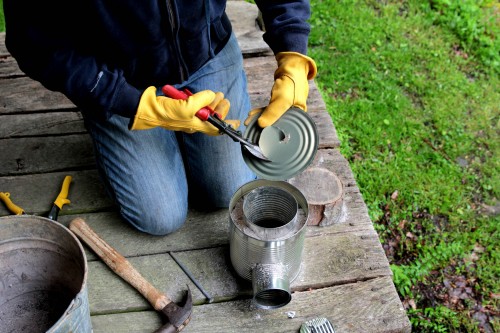
And now, you need to cover the ashes with tin that you cut from the top of the gallon can like this because this is a tidy hobo stove.
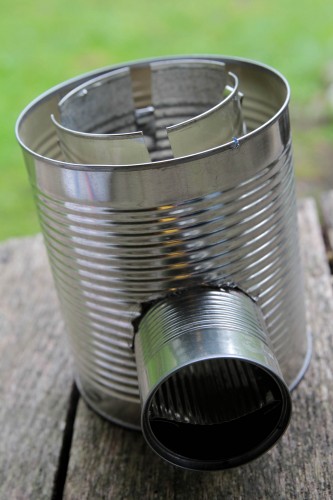
Now one last thing. Take the other bean can and use your tin snips to make it flat with the rims removed. You need to make a shelf like this for your fire. have it go all the way through the can so it sticks out a little into the middle of the juice can. Just wiggle it in so it stays. Cold air gets sucked into the juice can from below the fire shelf making a combustion chamber somehow.
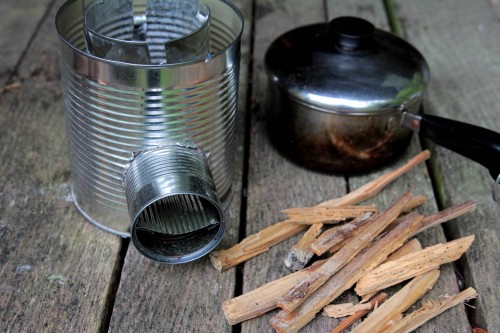
Ok, just one more thing. You need to make some vent holes, which I also have not yet perfected. I made them in the middle can like this. Now assemble some dry sticks, little ones. Waxed paper is a great fire starter. Put your stove on a fireproof surface, not an antique wooden porch. Lay your fire on the shelf and light it.
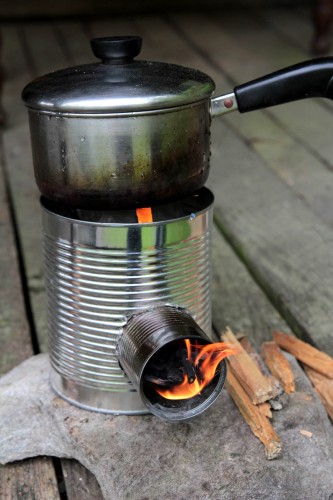
In exactly 5 minutes, you will boil water enough to make you a cup of tea with about 4 or 5 sticks! Up next is the tin-can rocket stove garden “cooking outfit” supplies post a la Dr. Ethel, lady hobo.
And, in case you’d prefer to make your stove in the company of others, well then, Wayne and I will be teaching a Hobo tin-can portable rocket stove class on Tuesday, June 11th from 5:30 til dark. We’ll make our stoves and then collect veggies from my gardens which we will COOK on our little stoves. Outside, picnic style. And I will learn how to crimp in the edges of the stove holes by then!
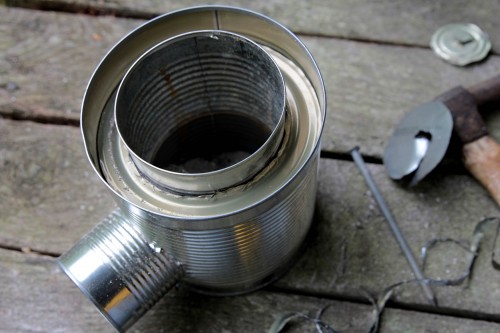
PS Folks have written in asking for more details about the shelf where you build the fire. Here’s a photo from the top down (of my now well-used little stove). 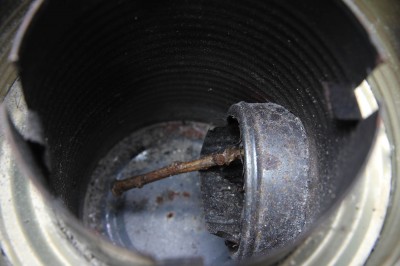
What you do is to cut the top and bottom off your second bean/soup/etc. can. Now you’ll tin-snip a line down the middle, from top to bottom of your cylinder, forming a rectangle. Scootch that into your little can so that it forms a shelf with air flow possible below and a place for your fire materials on the shelf. This little slice of tin will poke out into the middle of the large can and your tender will sort of just hang in the middle and burn like crazy if the draft is right. It’s all good. That’s where a little make-do fiddling around comes in.
For detailed (and updated!) instructions on how to make your own rocket stove, make sure to check out my new book, ‘Picnic Time‘! In addition to this little portable stove, I write about making picnic hampers out of found items like vintage doctor bags, handy picnic hints, and include tons of recipes for delicious portable food. Available on Amazon and our Native Ground website.
I’d like to see a pic from the top of the shelf, not clear on that. This is a great idea and project though, I want to make one
Hi Angel. Are you asking about the little shelf that you set the fire on? I’ll take a photo from the top down and post it.
It’s up. Hope that helps!
thank you so much for inspiring me. after meeting God. my new life is to go back to a simple life. not working hard for man./and not using any money for gas. cooking on this stove is perfect for me.i also plan on getting a old wooden stove one day.and live the life on the grid.i’ve learned how to become a farm girl.everyone that drove by saw me working.they yelled out.thats hard work,it wasn’t hard for me. because i have God. i had a great harvest.and i bought a small tomato tree for 50cents.the store man said.. you’ll never get that plant to grow. i told him. you didn’t cause you didn’t water it. i took it home and planted were God told me. my small dried up plant grew and grew. she grew over 5’6 tall. taller then me. i watered here and i say and talked to her everyday. she gave me 55 yummy large tomatoes. i also grew the best green beans ever.and i grew corn too. i hope to move soon to my small farm.thats my dream./thank you so much for sharing your tin can stove. you have inspired me. i’ll be sharing. love always donise. its true what our father in heaven says in jeremiah 33 verse 3. he says come to me and i will tell you wonderous things you did not know
Check out this cool stove made out of a beer can.
http://dailytimewaster.blogspot.com/2013/08/this-sort-of-stuff-delights-me.html
Oh I LOVE that stove! Putting it on the picnic basket stove list. Send me a photo if you make one.
Ha! I will definitely send you a photo. I’m planning on involving my teenagers in just such a project this weekend. All teenagers ought to know this vital skill, don’t you agree?
Yes I agree. Just be sure they tie their teenage hair back, that alcohol stove ignites like gangbusters!
i like this! will try it … thanks for sharing!
I figured out the whole thing until you got to the shelf thingy. I do not see a pic and it is the least explained. please take a pic of it. Otherwise a great tutorial.
Thanks, Linda! Photo is up of the shelf.
yupa pic from top looking down in from top to see shelf and where bean can terminates into center juice can would give a better uderstanding of it!thanks
I added a photo of the shelf from the inside. You have to mess around with the air flow until you get it right. So excited about the interest in this wonderful stove!
I can’t see where the vent holes go from the picture.
Hi Michelle. Glad you wrote! There are three ways that air can get into the little stove once you stick a pot on the top. The first is the cuts on the top of the inner juice can just under where you place your pot. And actually, you might want to add a couple more than 4. The other drafts come through the bean can where you have the fire. The little shelf bisects the can. On top of the shelf, you place your kindling and that will draw air. Underneath the shelf (look at the photo third up from the bottom) is the biggest draft; air gets sucked up when you start a fire, so it’s not an official vent, it’s more of a draft. The video link is super at explaining all the sciency stuff of why it works. I cook with a wood cookstove, and that’s sort of the same principle. The draft under the firebox really controls the heft of the fire. I bet there’s someone out there who can explain this better?
Do you think my #10 dutch oven will sit on this? I can cook just about anything in it.
I would just need to keep feeding the wood to it. I’ve got lots of sticks.
I just tried sticking a dutch oven on the stove. It can be done, but you need to adjust the stove to improve the air flow because a large pan on the top will smother the flame. Either elevate the inner can when you construct the stove (on a little fine gravel, perhaps) or bend down the sides at the top of the outer can as in this photo http://rocketstoves.org/
Also you need to put your stove on a super flat surface so it won’t tip over since the pan will outweigh the stove. Let me know how it works!
I take it that the shelf you are referring to is the one mounted inside the little can going through the side of the two bigger cans and that shelf pokes out a smidgen in the inner part of the center can… more or less just barely through the wall and hanging out a bit.
Exactly, Randy. Only the shelf is not mounted, it’s just stuck in there.Look on this link http://rocketstoves.org/, you can see it better than in my photos.
Great stuff!
does the pineapple can need to be taller than the gallon can to allow draft?
oops !! sorry! If I would just read I would know !!
Looks like you figured it out, Jim. You just need to figure out how to not smother the draft when you put your pot on the top of the stove, any old way you can. (I make stoves the same way I cook!)
Hey, I just thought I would make a quick suggestion, since you mentioned not to leave it on a surface that can burn. If you made the hole in the gallon can an inch or so above the pineapple can hole then you can let that ash fill between the bottom of the pineapple can giving it some insulation on the bottom of it as well. In other words when you make your measurement on where the hole should be for the gallon can make it an inch higher. Calculating for the cross section bean going across and connecting to the pineapple can at the same spot as usual at the bottom, giving a gap between the bottoms of the pineapple and gallon cans. Then fill the gallon can with an inch of ash on the bottom before putting the middle section can in or assemble it completely and then when pouring the first bunch of ash just gently spin it to let the ash spread down under the can (might be cleaner that way). You may have to cut the pineapple can as well to make sure it isn’t too tall and sticking out of the gallon can. I am a gallon can away from testing this, and then I will report back, but I think it is a good solution. I am going to take one to my dad who is living in a park in Seattle temporarily.
Also, after reading Barbara’s comment I am wondering if she meant to lower the inner can and elevate the outer can, because the picture seems to show the inner pineapple can completely bent down, which would make it so you don’t need to cut the top of it for airflow. But like I said, I will report back after I make it. I think having it completely bent down might lower the flames intensity.
OK, you are right, outer can needs to be higher than inner can with vent holes on the outer can. I just spoke with my physicist son and he gave me the scoop on convection blah blah blah. Will try tomorrow and update the post. This is fun.
It seems that any two or three heavy pieces of some kind of metal rod could be placed across the top of the cans to hold a pan and solve the air flow problem. The rods could be stashed inside the pineapple juice can for transport maybe.
Interesting idea, Judi. You would not believe what I did yesterday, I’ll have to write about it, similar adaptation to your idea. I was at our remote cabin all ready to make adjustments to the cans and noticed the tin snips had gone missing. I stuck three giant iron nails between the cans to prop up a skillet. Worked great. Only they are heavy.
Oh thanks for the tip, think I’ll try that next time. Still I recommend not using this inside or on a porch (like the photo) because burning sticks can fall out of the little fire can. I use mine on the ground usually, picnic style. You can check your local restaurants for empty gallon cans (you need the lids, though). I want to see a photo when you make yours!
Thank you, Barbara- Lovely little stove. Nice pictorial and follow up Q/A. When I was in Mexico everyone had these rocket hot water heater/stoves made out of an old car muffler. It was much heavier duty than a tin can design. A garden hose connected to a pipe that was welded to the outer shell of the muffler, and the fire went in the inside cylinder. the exhaust pipe was the chimney. 5 little sticks burnt in five little minutes gave me five minutes of gorgeous, scalding shower water. I can’t seem to find any details for building one of these things. I saw one in a hardware store down there for 150.00…I’d love to make one for my garden bath, I get a bit manky out there, nipping at the brambles!
Any links/ ideas?
You get manky? I love it, where do you live, Erik? I did a quick search and came up empty-handed. Maybe someone else out there has links/ideas. I’m fascinated.
i really enjoyed this read, thank you….will be experimenting when i eventually get home [where the tool kit lives!]. probs best not to try to carry one in checked luggage anyway…would send the TSA through the roof 🙂
I like the idea of a small stove but one thing I seen in your pictures that is not noted is tinsnips come in straight left and right cut it looks like you used straight and left i think some people might not have seen that in the pictures i have a milk can with a stove pipe damper in the neck of it and a rusted out bottom that works pretty good also thanks
Ha! I don’t know anything about tin snips! I used what I found in the tool shed of our off-the-grid remote mountain cabin. What sort would you recommend for this project, Nathan? And also do you have a photo of your milk can stove? I’d love to see it.
BRAVO! What a great idea! When I first seen this I thought pffft! I don’t need no directions to make this thing! (From a mans point of view) But…..er….um…. WELL…. I did not see there was another can inside that can and more can stuff and thingys and. Well…..So To make a LONG story short I have to say Bravo! Very well written with great pictures! And a great Idea!
Ha! Maybe I’m a man? I didn’t follow directions myself when I made this version, just saw a photo. I’ll do it a bit different next time, but figuring out and tinkering around with it is the fun part (plus the cooking my veg in the garden 5 seconds after picking part). Hope you make one, Ron.
Hi Barbara , ‘Not to be a stickler for details, but for historical reasons it is important to note that the San Francisco earthquake and fire actually occurred in 1906.
Oh thank you, Jen, you are right! I made the correction.
thank you for such a wonderful project for anyone who may not have a home and for so kindly sharing it with others. You are an amazing and wonderful person. Sincerely, Anne Nickerson Klausky
Thanks for the great plans. . I have made numerous alcohol stoves but am definitely going to try my skills on a rocket stove. . .can’t wait!!!
Thanks for all the info. We are researching this kind of stove for use by refugees in Africa, and are having trouble finding info on the life-span of tin-can stoves. How long do you think this stove would last in daily use before the insides broke down from the heat? Or is there another likely mode of failure we should consider?
Great questions, Toby. While I’ve made several other rocket stove versions since this post (it’s a design work-in-progress), I’m not the person you need to talk to for such an ambitious and admirable project as using them for refugees in Africa. The stoves are well researched and there are lots and lots of articles online about the particulars of building and using them, for example this one from NPR a few years ago. As far as durability over time, you’re just making a tiny fire with a few sticks and if the design is good, you should not create huge wear and tear on the inside can other than the little shelf that holds the actual fire. Though they do create quite a lot of heat that shoots out the top. Good luck to you!!
Thank you and I absolutely LOVE your book suggestion!!! What a cool chic! Sounds way more exciting than “ On The Road” , I wonder how her story is not better known? Maybe because she was female? I would watch a movie about someone like that. Wow. Thanks again!
I see quest and comments spanning a number of years and would like to add my own. First off, the stove is absolutely brilliant! Secondly, where in the world do you find gallon cans? I’m dying to try this. ?